Sushi bake is taking the culinary world by storm, offering a delectable twist on the traditional sushi roll that we all know and love. This dish, a savory casserole that deconstructs the essence of sushi and bakes it to perfection, has become a favorite for its ease of preparation and the delightful fusion of flavors. In this article, we’ll dive deep into the world of sushi bake, exploring everything from its basic ingredients to the step-by-step process of creating this mouthwatering dish. Whether you’re a sushi aficionado or a casserole connoisseur, this guide promises to equip you with all the knowledge you need to whip up a sushi bake that’ll have everyone asking for seconds. So, let’s roll up our sleeves and get started on this culinary adventure!

Introduction to Sushi Bake
What is Sushi Bake?
Imagine your favorite sushi roll. Now, picture it deconstructed and layered in a casserole dish, then baked to achieve a caramel-y perfection that’s hard to resist. That, my friends, is a sushi bake. This innovative dish takes the intricate flavors and textures of sushi and transforms them into a hearty, casserole-style meal that’s perfect for sharing. It’s like having a sushi party in a dish, where every spoonful brings you a delightful mix of sushi rice, seafood, and toppings, all warmed up for your enjoyment.
The Rise of Sushi Bake Popularity
But why has sushi bake become such a hit? Well, for starters, it’s incredibly convenient. Traditional sushi rolls require a certain level of skill and patience to prepare, from the rolling to the slicing. Sushi bake, on the other hand, simplifies the process without compromising on taste. It’s an ideal solution for feeding a crowd, making it a popular choice for potlucks, family dinners, and social gatherings. Plus, its versatility means you can customize it with your favorite sushi ingredients, making every bite a new experience.
The allure of sushi bake lies not just in its flavors but also in its ability to bring people together. It’s a dish that invites experimentation and shared enjoyment, bridging the gap between traditional sushi and the comfort of a home-cooked meal. As we delve further into the components and preparation of sushi bake, you’ll see just how this dish has managed to capture the hearts (and stomachs) of food enthusiasts around the globe.
Stay tuned as we explore the essential ingredients and quantities needed to create your very own sushi bake masterpiece. With a little bit of prep and a dash of creativity, you’re well on your way to enjoying a dish that’s as fun to make as it is to eat. Let’s get baking! Is it better to bake salmon at 350 or 400?
Essential Ingredients and Quantities
Creating a sushi bake is like painting a masterpiece; it all starts with having the right ingredients on your palette. Here, we’ll break down the essentials, ensuring you’ve got everything you need to whip up this delightful dish. Remember, the beauty of sushi bake lies in its versatility, so feel free to tweak the ingredients to suit your taste buds!
Ingredients for the Rice
- Sushi Rice: The foundation of any sushi dish, including our bake. You’ll need about 1 1/2 cups of sushi rice, ensuring it’s rinsed well to remove excess starch.
- Rice Vinegar: A crucial element that adds the distinctive sushi flavor to the rice. Mix in 1/4 cup for that tangy touch.
- Sugar and Salt: These enhance the rice’s flavor. A tablespoon of granulated sugar and a teaspoon of salt should do the trick.
- Furikake and Sesame Seeds: To sprinkle over the rice for an extra layer of flavor and texture. A tablespoon of each will suffice. This Japanese-inspired sesame seaweed seasoning is a game-changer, adding a burst of umami to every bite. How long to bake salmon at 400
Ingredients for the Sushi Bake
- Cream Cheese: Soften 1/2 cup to mix with your seafood, giving the dish a creamy texture.
- Crab Meat or Imitation Crab: 8 oz finely chopped or shredded, depending on your preference. This adds a sweet, seafood flavor that’s hard to resist.
- Cooked Shrimp (or Salmon, Tuna): Another 8 oz, cooked and finely chopped. Feel free to choose your favorite seafood here.
- Mayo (Japanese Mayo Preferred): 1/4 cup for that creamy, tangy flavor. Kewpie mayo is a great choice for its rich taste and smooth texture.
- Nori Sheets: 2 large sheets or 3-4 small ones to cover your baking dish. This seaweed wrap brings the unmistakable sushi essence to the dish.
- Asparagus: 4 stalks, blanched and chopped into 1-inch pieces, adding a crunchy, fresh element.
- Sriracha Mayo and Unagi Sushi Sauce: 2 tablespoons each, drizzled over the top for a spicy kick and a sweet, umami finish.
Toppings and Garnish
- Scallions: 2, diced, for a sharp, fresh topping.
- Avocado: 1 large, diced, adding a creamy, buttery texture.
- Cucumber: 1 large, diced, for a crisp, refreshing contrast.
- Additional Furikake: A final sprinkle to garnish, enhancing the dish’s visual appeal and flavor.
With these ingredients at the ready, you’re all set to embark on the culinary adventure of making a sushi bake. Each component plays a vital role in creating the harmonious blend of flavors and textures that make this dish so unique. In the next section, we’ll dive into the step-by-step guide to assembling and baking your sushi masterpiece. So, sharpen your knives (figuratively speaking, since there’s no actual sushi rolling involved) and preheat your ovens—it’s time to bake!
Step-by-Step Guide to Making Sushi Bake
Now that we’ve gathered our ingredients, it’s time to roll up our sleeves and dive into the heart of sushi bake creation. This step-by-step guide will walk you through the process, ensuring your sushi bake turns out perfectly. So, let’s get started!
Preparing the Sushi Rice
- Preheat Oven + Prep Baking Dish: First things first, preheat your oven to 425° F and prepare a 9×13 baking dish with nonstick spray. This ensures your sushi bake doesn’t stick and makes for easy serving.
- Cook the Rice: In a pot, combine the rice vinegar, granulated sugar, and salt. Bring to a boil, stirring until the sugar dissolves. Add your rinsed sushi rice and the amount of water recommended on the package. Cook according to the package instructions.
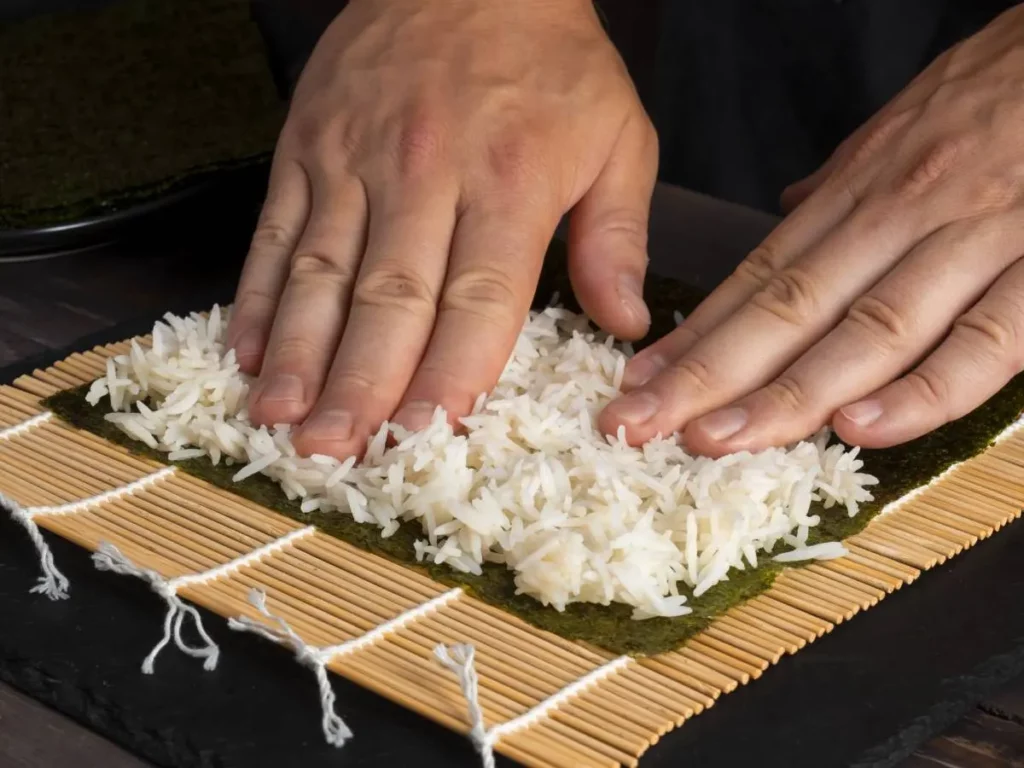
- Season the Rice: Once the rice is cooked, remove it from the heat. Mix in the furikake and sesame seeds, then press this mixture into the bottom of your prepared casserole dish, spreading it evenly. This seasoned layer of rice will form the delicious base of your sushi bake.
Assembling the Sushi Bake
- Combine Seafood and Cream Cheese: In a small bowl, mix the softened cream cheese with your choice of seafood (crab, shrimp, salmon, or tuna) and the Japanese mayo until well combined. This creamy seafood mixture will add a rich, savory flavor to your dish.
- Layer the Nori: Place the Nori sheets in a single layer over the rice. This adds the essential sushi flavor to your bake.
- Add the Seafood Mixture: Spread the seafood and cream cheese mixture over the Nori, ensuring it’s evenly distributed. This layer is where the magic happens, blending the flavors and textures of traditional sushi in a delightful new way.
- Top with Asparagus: Scatter the blanched asparagus pieces over the seafood layer. Their fresh, slightly crunchy texture contrasts beautifully with the creamy seafood below.
- Drizzle with Sauces: Finally, drizzle the sriracha mayo and unagi sushi sauce in a diagonal pattern over the top. These sauces will caramelize beautifully in the oven, adding a spicy and sweet depth to the dish.
Baking and Garnishing
- Bake: Place your sushi bake in the preheated oven for 15-20 minutes or until hot and bubbly. Watch closely to ensure it doesn’t burn, as you want a caramel-y, not charred, finish.
- Garnish and Serve: Let the sushi bake rest for a few minutes after removing it from the oven. Then, top with diced avocado, cucumber, scallions, and a sprinkle of furikake for an extra burst of flavor and color. Serve warm and enjoy the symphony of flavors!
Creating a sushi bake is an adventure in flavors and textures, combining the beloved elements of sushi in a warm, comforting casserole form. This dish is perfect for sharing with friends and family, bringing a piece of sushi bar elegance to your dining table with a homey twist. In the next section, we’ll explore the perfect accompaniments to serve with your sushi bake, elevating your meal to new heights. Stay tuned!
What to Serve with Sushi Bake
A sushi bake, with its rich flavors and hearty texture, is a star dish on its own. However, pairing it with the right side dishes can elevate your meal to an unforgettable dining experience. Here are some suggestions for complementary dishes that balance the richness of the sushi bake and add a refreshing contrast to your meal.
Salad Options
- Asian Slaw: A light, crisp salad made with cabbage, carrots, and a tangy vinaigrette can provide a refreshing counterpoint to the richness of the sushi bake. The crunch of the vegetables and the acidity of the dressing cleanse the palate, making each bite of sushi bake as delightful as the first.
- Cucumber Salad: Thinly sliced cucumbers marinated in rice vinegar, sugar, and sesame seeds offer a cool, crisp texture and a slightly sweet flavor that complements the warm, savory notes of the sushi bake.
Miso Soup
- A warm bowl of miso soup, with its soothing umami flavors, is the perfect accompaniment to a sushi bake. The soup’s simplicity and depth of flavor provide a comforting balance, making it a must-have side dish.
Edamame
- Steamed young soybeans lightly salted or seasoned with garlic and chili flakes serve as an excellent starter or side. Edamame’s subtle sweetness and satisfying bite make it a great snack to nibble on as you enjoy your sushi bake.
Pickled Vegetables
- A selection of pickled vegetables, such as daikon radish, carrots, and cucumbers, adds a bright, tangy element to your meal. The acidity and crunch of the pickles cut through the richness of the sushi bake, refreshing your taste buds.
Sesame Noodle Salad
- Cold noodles tossed in a sesame oil and soy sauce dressing, garnished with spring onions and sesame seeds, offer a delightful textural contrast and a nutty, savory flavor that pairs beautifully with the sushi bake.
These side dishes not only complement the flavors and textures of the sushi bake but also turn your meal into a well-rounded feast. By incorporating a variety of side dishes, you can cater to different tastes and dietary preferences, ensuring there’s something for everyone at the table.
In the next section, we’ll cover tips for storing and reheating your sushi bake, so you can enjoy this delicious dish to its fullest, even as leftovers. Stay tuned for practical advice on keeping your sushi bak tasting fresh and delicious!
Storing and Reheating Sushi Bake
While sushi bake is best enjoyed fresh from the oven, leftovers can still make a delightful meal if stored and reheated properly. Here’s how to keep your sushi bake tasting as delicious as the day you made it.
Refrigeration and Shelf Life
- Cool Down: Allow your sushi bake to cool to room temperature before storing. This prevents condensation from forming inside the container, which could make the rice soggy.
- Airtight Container: Transfer the cooled sushi bak. to an airtight container. This keeps out moisture and other flavors from the fridge that could affect the taste of your sushi bak.
- Shelf Life: Properly stored, sushi bake can last in the refrigerator for up to 3 days. Beyond this, the quality begins to decline, especially the texture of the rice and seafood.
Reheating Instructions
- Oven Method: Preheat your oven to 350° F. Cover the sushi bake with aluminum foil to prevent it from drying out. Reheat for 10-15 minutes, or until it’s heated through. This method helps preserve the texture and flavors of the dish.
- Microwave Method: If you’re short on time, you can also reheat sushi bak in the microwave. Place a portion on a microwave-safe plate and cover it with a damp paper towel. This adds moisture back into the dish, preventing it from drying out. Heat on high for 1-2 minutes, or until warm. Be mindful that microwaving can slightly alter the texture, especially of the rice.
It’s worth noting that while you can store and reheat sushi bak, freezing is not recommended. The textures of the cooked rice and seafood do not fare well in the freezer and can become mushy upon thawing and reheating.
By following these storage and reheating tips, you can extend the life of your sushi ba and enjoy it for more than just one meal. Whether you’re savoring leftovers for lunch or serving them as part of a casual dinner, these practices ensure your sushi ba. remains a tasty and satisfying treat.
In the final part of our guide, we’ll answer some frequently asked questions about sushi bak, helping you navigate any uncertainties and inspiring you to experiment with this versatile dish. Stay tuned for helpful insights and tips to perfect your sushi bak. experience!